While being a resident of the internet this past week I found this video. The TL;DR of the video is: Your mind can decpher moving objects even when any given frame doesn’t have intelligible data. This affords you some interesting opportunities. In the context of the video, the creator is messing arround with godot. Having the skybox use a static image of static (aka noise) then having objects use the same noise. Sounds like everything is invisable, right? And you are correct if no thing is moving. Now, once something starts moving, that’s where the fun begins. Somehow (I’m not going to pretent I know why this works) your mind can use previous images to help decpher the current image. While this is a very cool game idea, it also sounds like a good techonology to use for a captcha.
Requirements
- Run from the command line
- Allow for 6 characters to be displayed
- The server needs to know the 6 characters so it can verify the correct answer.
Building
Firstly I knew I would need an image filled with static. This sound like a job for imagemagick. A very cool and very powerful CLI image editing tool. Think something like GIMP or Photoshop, but all from the command line.
Magick can be invoked using the convert command. (Note that sometime between v6 and v7 the command changed from convert to magick, but convert still works.)
Let’s start with some random noise
convert -size 100x100 canvas: +noise Random -monochrome noise.png

Very cool, we now have noise. We will also need some text. How about the string “hello”:
convert \
	-background none -fill black \
	-pointsize 24 -size 100x100 -gravity center \
	label:hello mask.png

Good, now overlay them:
convert noise.png mask.png -gravity center -background None -layers Flatten layered.png
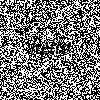
Now, you can probably see the issues:
- It’s not moving
- The text is solid, not noisy like it’s supposed to be
So, let’s tackle the first problem; movement.
Since we have a static image and need to to be moving, what better format that .gif? We can run a bunch of images back to back as separate frames of a gif! First thing’s first. We need a bunch of images. We should also introduce some variables so we can change parameters later.
# Width of the output
X=100
# Height of the output
Y=50

mkdir -p back out fore

# Create our mask
convert \
	-background none -fill black \
	-pointsize 24 -size ${X}x${Y} -gravity center \
	label:hello mask.png

# Create 10 frames
for i in $(seq 1 10); do
    # Create noisy background images
	convert -size ${X}x${Y} canvas: +noise Random -monochrome back/${i}.png
done

for i in $(seq 1 10); do
	# Layer the text on the background
	convert back/$i.png mask.png -gravity center -background None -layers Flatten out/$i.png
done

# Combine all the images in the `out/` directory into a .gif
convert -delay 1 -loop 0 out/* out.gif

By reading the code comments you can probably get the gist of what’s happening. First we create the text mask. Then we create 10 frames of background static, then layer the text on the background. Then finally select everything from the out/ directory and combine it into a .gif.
Now that we see it’s working, we need to disguise the text:
for i in $(seq 1 10); do
	convert -size ${X}x${Y} canvas: +noise Random -monochrome back/${i}.png
+++	convert -size ${X}x${Y} canvas: +noise Random -monochrome mask.png -compose CopyOpacity -composite fore/${i}.png
done

for i in $(seq 1 10); do
	# Layer the text on the background
---	convert back/$i.png mask.png -gravity center -background None -layers Flatten out/$i.png
+++	convert back/$i.png fore/$i.png -gravity center -background None -layers Flatten out/$i.png
done

Hmm… well that’s no good! Even though they are technically two different peices of noise layered, we can’t tell the difference!
After re-watching the video it seems that we need to use a smoothly scrolling peice of noise instead of lots of random pictures of noise just strung together sequentially.
We can start by making the noise to be one long image:
--- for i in $(seq 1 10); do
--- 	convert -size ${X}x${Y} canvas: +noise Random -monochrome back/${i}.png
--- convert -size ${X}x${Y} canvas: +noise Random -monochrome mask.png -compose CopyOpacity -composite fore/${i}.png
--- done
+++ convert -size 2000x${Y} canvas: +noise Random -monochrome background.png
+++ convert -size ${X}x${Y} -background none -fill black -pointsize 24 -gravity center label:hello mask.png
It’s now 2000px long

And the mask is back to just being black text, with alpha arround it.

Now we need to animate it. Just like how imagemagick is good for CLI image editing, ffmpeg is great for CLI video editing! So let’s take a look. To not make this post take forever, here’s the final ffmpeg command I came up with. There are thousands of ffmpeg options to choose from.
ffmpeg -loglevel error -hide_banner -y -framerate 60 -loop true -t 10 -i background.png -i mask.png \
	-filter_complex "
		[0] crop=x=n:w=${X}:h=${Y},split[bg][a];
		[a] hflip,vflip [flip];
		[1] alphaextract [mask];
		[flip][mask] alphamerge [text];
		[bg][text] overlay"\
	-c:v libx264 -crf 10 -an out.mp4
Here’s a quick breakdown:
ffmpeg -loglevel error -hide_banner -y -framerate 60 -loop true -t 10This hides away most of the output, considering this will go into automated systems, we don’t need it. Obviously the framerate is set to 50 then-t 10sets the total durration to 10 seconds.-i background.png -i mask.png \This pulls in background as input 0 and mask as input 1.- Here we get into the video filters:
-filter_complex "Start the filter[0] crop=x=n:w=${X}:h=${Y},split[bg][a];Take input 0, crop it to the width(w) and height(h) of the rest of the clip. We also set the x location of the crop (x=) to offset every frame (n=current frame). So for frame 0, the x offset is zero, but on frame 1, the x offset is 1, etc. We then split this stream into two other streams, naming them “bg” and “a”.[a] hflip,vflip [flip];Take the “a” stream, flip it on the horizontal axis, then the vertical axis. Send this out down the “flip” stream. The horizontal flip makes it appear that the text’s static is moving opposite to the background. The vertical flip is so that small characters (like “h”) don’t look weird if they are near the center. (Try removing the vflip and saying hi!)[1] alphaextract [mask];Take input 1 (the mask) and turn it into a alpha mask.[flip][mask] alphamerge [text];Take the input “flip” and “mask”, then mask out “flip” using “mask”. This will cause the “flip” stream to only show where it overlaps with “mask”. Then send this as the “text” stream.[bg][text] overlay"\Collect streams “bg” and “text” and overlay them.
-c:v libx264 -crf 10 -an out.mp4Finally; set the video codec (-c:v), the compresssion (-crf), and remove the audio track (-an) (there wasn’t one to begin with, but it’s nice to be sure.) Then output all of this into the fileout.mp4.
Then here’s the final product!
Try pausing the video and watch the text dissapear!
This fufills requirement 1. To fufill requirement 2 will just take some tweaking of the size. Then to fufill requirement 3 we just need to take in an argument from the command line, then use that as our text.
Taking in input from the command line is as easy as:
convert \
	-background none -fill black \
	-pointsize 120 -size ${X}x${Y} -gravity center \
---	label:hello mask.png
+++	label:$1 mask.png
Then we are all done! Check out the full code here.
Why did I do it like this?
If you watched the video you may have noted an interesting difference between Branta Games’s demo and mine (take a look 3:12). He’s using a moving background but a static foreground. So why did I choose to do both a scrolling foreground and background?
Considering the nature of captchas, we are trying to make a system where humans can decyper text, but robots can’t. Our enemey is an automated one. Here’s the system diagram so you can visualize the threat better
+------ Server ------+      +------ Client ------+
|                    |      |                    |
| 1. Generate video  | ---> | 2. Download video  |
|                    |      | 3. Parse video     |
| 5. Verify response | <--- | 4. Send result     |
|                    |      |                    |
+--------{Us}--------+      +------{Threat}------+
We can only control the settings during the generation, but the attacker can control all the parsing settings.
So let me show you why not scrolling the foreground is a bad thing. If we change the ffmpeg filters to look like this:
--- ffmpeg -loglevel error -hide_banner -y -framerate 60 -loop true -t 5 -i background.png -i mask.png \
+++ ffmpeg -loglevel error -hide_banner -y -framerate 60 -loop true -t 5 -i background.png -i mask.png -i background.png \
...
--- [0] crop=x=n:w=${X}:h=${Y},split[bg][a];
+++	[0] crop=x=n:w=${X}:h=${Y}[bg];
--- [a] hflip,vflip [flip];
+++	[2] crop=w=${X}:h=${Y}[a];
	[1] alphaextract [mask];
--- [flip][mask] alphamerge [text];
+++	[a][mask] alphamerge [text];
	[bg][text] overlay"\
If you don’t want to decpher what that diff changed; basically we added a third input containing the background image (again) then used this with the mask to create a static foreground. Here’s the result:
Now, why is this a bad thing? I’ll show you. If the attacker were to download this video then split every frame into individual pictures, then merge them together into one picture you could make it much easier to see the words. (You can download that video if you want to follow along.)
Step 1
Take the video and break it into every frame:
mkdir frames
ffmpeg -i wrong.mp4 frames/frame%04d.png
You should now have 600 images (10 seconds of 60fps | 10*60=600).
Step 2
So now you can take every frame and mask out the white. If you are familiar with chromakeys (greenscreen) that is pretty much what we are doing. Just more of a “white-screen” than a greenscreen
mkdir chromakeyed

for f in frames/*
do
    convert $f -fuzz 99% -transparent white chromakeyed/$(basename $f)
done
Now that we have every frame processed, we can merge them all
convert chromakeyed/* -background red -flatten flat.png
Super easy to see!

How about if we try that trick on the file where both the foreground and background are sliding?

Nice!
Here’s the full merging script:
#!/bin/bash

# Split the frames out
mkdir frames
ffmpeg -i $1 frames/frame%04d.png

# Change the white -> transparent
mkdir chromakeyed
for f in frames/*
do
    convert $f -fuzz 99% -transparent white chromakeyed/$(basename $f)
done

# Merge all the frames into one image
convert chromakeyed/* -background red -flatten flat.png

rm -r frames chromakeyed
Breaking it
It should be noted that if you mess with the fuzz percent you can get some intelligible data out of even the “better” method of moving both the foreground and background. The previous examples were done with 99% fuzz, to prove a point, but what about trying some other values? Since the fuzzing is done on the attacker’s machine, they can use whatever fuzz percent they want.
 0%
0%
 25%
25%
 50%
50%
 75%
75%
 99%
99%
 100%
100%
Midigation
As you can see from the 0% and 100%, by just chaning the fuzz value we can get more intelligible text. Interestingly, while the background is red, at 0% we are decypering the words with the color white. Hmm, that’s odd. It would seem that we aren’t actually seeing thru to the background, but more just reading the artifacts of multiple images. What if we mess with the amount of data that exists, so that merging isn’t as effective.
Let’s first change the amount of data by shortening the video, and reducing the framerate. We will also try to compress the video. Here are the best (well, worst, because we can read them) results. (The images above were 10 seconds @ 60fps, crf 1)
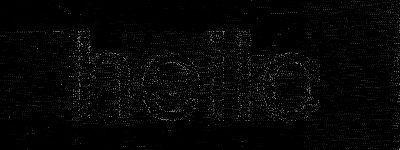 10 seconds @ 60fps, 50% fuzz, crf 30
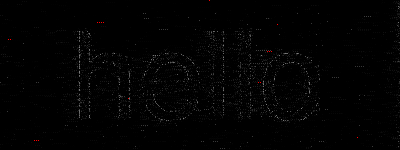 1 second @ 24fps, 50% fuzz, crf 30
It looks like having less data makes the text more visable! These were both done with -crf 30. The -crf flag sets compression. Testing again at -crf 1 made the problem much worse, it was incredibly easy to read the text:
 1 second @ 24fps, 50% fuzz, crf 1
According to the ffmpeg docs crf can go from 0-51. With 0 being the best quality, and 51 the worst. Since the attacker can always increase the compression once they’ve downloaded the video, our only option (and luckily for us, the best option) is to increase compression. Since we could still see the words at 30, let’s try 40
 1 second @ 24fps, 50% fuzz, crf 40
Going up to 50 just breaks the whole point, while there is no possibilies of reading the letters with a computer, there is an equially non-existant chance of a human reading the video.
Conculsion
1 second @ 24fps, crf 40
In my opinion, having only 24fps makes this hard to see, but increasing the framerate can make the words a bit easier to see when merged (yes, this is opposite of our previous findings.) As fancy and unique as I thought this idea was, it looks like we are back in the same old trench of: hard enough so that a computer can’t read it, but easy enough that a human can.